Saturday, January 10, 2009

Who said we can just wire the TV?? @@


Yeah.. it didn't work.. I was right... the frequency is different between computer monitor and the arcade TV, first, is the frequency, second, the resolutions... so.. after spending hours of wiring @@ , now, i'm back to the old issue again. I think I prefer to use an monitor... all I need to do is figure how to mount it... We finally took the arcade apart... I'm more like a do-it person when there are not risk to take things apart. And oh.. yeah.. 5 mins works saved our few hours research, nice!


And so far, we've got 6 games for sure. I hope I can find more in the future.

Pinball: excellent
NeverBall: simple control, nice
Blobwars: mouse key works perfectly!
Raid'em(raidem) - perfect game!! 2 players, easy keymap, turn "eye candy" option to min
SuperTux(supertux) nice LUX game
frozen-bubble nice cute game, 2 players
Game List for our wiki page


Key mapping plan is done and test with games. All we have to do is wire the controllers and test it. That's what I'm gonna do after this blog.


After all, I've gotta say thank you to Stephen Liang. He's been putting a lot of affort on this project, working so hard quietly.

BTW.. why dose NEC use LG/Philips screen?? That's weired..

Regular CRT Monitor


Tuesday, January 6, 2009

Arcade Project Update

Naked Keyboard


Happy New Year!

During this holiday, Stephen, Mohak, Patty and myself went to school to do the arcade project. Mohak was doing the game search. Patty was taking care the labeling for some cables and Stephen was doing research on key mapping and he also started some soldering for the key mapping also. At that time, I set up a network for the arcade machine, so Greg can ssh there and install the arcade launcher. I had great trouble of installing the launcher since there are a lot of dependency to install for Perl.

It was a great fun day, we faced a lot of small problems and finally fixed. We spent a lot of time on researching. We found that when we actually start doing the arcade is totally different to what we expected.

Stephen and I went to college for the arcade project during the holiday, but it seems that the access card was disabled since it was holiday. So, Stephen did the rest of soldering in study area which is located in second floor.

Too bad that it looks like we are not going to finish this arcade project before Semester 2 starts. But for sure we'll arrange sometime to complete this arcade in the future. Currently the project is 60% completed. Here is the work load I would assume...

- launcher installation - 4 hours, Greg
- controller wiring - 6 hours, Stephen Liang, Nestor
- games and launcher integration and testing - 3 hours, Greg
- launcher, game, controller test - 5hours, Nestor, Greg, Stephen
- hardware installation - 5 hours

Although it seems hard, but I am still hopping we can finish it before semester start...


Installed Game List:
1. Torcs
2. quake3 demo - need to pair the keys well
3. Frets On Fire - no yum install, make failed, try rpm, may need to pair 2nd joystick also
4. NeverBall -
5. Blobwars
6. Pinball
7. LBreakOut2(lbrickbuster2)
8. Raid'em(raidem) - turn "eye candy" option to min
9. Dodgin' Diamond II (dd2)
10. Kobo Deluxe - nice
11. Njam - pc-man
12. Barbie Seahorse Adventures(seahorse-adventures) - an classic looking adventure game
13. Shippy - a nice old school classic shooting
14. Tecnoballz
15. XGalaga(xgalaxy) - a nice old school classic shooting

Monday, January 5, 2009

Keyboard logic board soldering

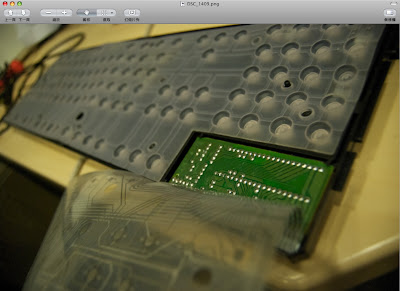
I did the soldering for the keyboard for our arcade machine. It has 27 wires and it's separated into 2 set, column and row. So, we have 18 columns, lets say column is A to R and Row is 1 to 9. When we press Y, it connect the row E and column 2 together, then the signal from the keyboard will be sent to the PC. Here is the photo of the keyboard chip.


We are planning to complete wiring the keyboard logic board to the controller the end of this week.